
The sun on your face.
The gentle splash of the paddle dipping into the water.
The breeze rustling in the cattails and blackbirds dancing overhead.
A ripple in the water – was that a fish?
Holding your breath as you glide silently toward a family of painted turtles sunning themselves on a rock at the shore. How close can you get before they disappear into the water?
For our guesthouse residents who are new to canoeing: this one’s for you.
If you call Painted Turtle Lake home, read on for everything you need to know to take your own turtle tour without ending up in the drink. With just a few simple guidelines, you’ll be paddling like a pro in no time.
Canoeing has a way of slowing everything down.
Even when I’m not in a canoe, all I have to do is close my eyes and I’m there. The rhythm of the paddle, the lapping of the water, the quiet sounds around the lake — they calm my nervous system almost as much as being on the water itself. All I have to do is close my eyes and I can feel myself there.
My family and I took weeks-long backcountry canoe trips every summer when I was a teenager. These experiences shaped so much of myself at the time. Living in sync with the land pushed us to get to know nature, ourselves, our amazing capacities and even our limits. And there’s nothing like being in the middle of nowhere with only the endless sky above and water below to force us siblings to get along!
Our Painted Turtle Lake gives you a pocket-sized experience of the big canoe trip. You’ll get the rich, meditative sensory bath and nature discovery without the long days, surprise rain storms, messy portages and too-close-for-comfort bear encounters!
The lake is the perfect size for beginners – with only 2 acres to paddle in, you can’t get lost or stuck. Even if you struggle with the steering, you’ll still end up back at the dock eventually without too much trouble.
Back when we hosted short-term stays in the studio, dozens of people took their very first paddle in our canoe on Painted Turtle Lake. One guest even christened their favourite turtle Sheldon on their inaugural outing. I still pass along their greeting whenever I make it down to the shore in summer.
These days, the lake is a private, shared treasure for those who call our guesthouse home.
I hope this little guide helps you feel confident enough to take your first paddle too!
*Remember to check our Tenant Manual for where we keep all our gear before you head down to the lake.*
Meet Courtney Love

Our canoe’s name is Courtney Love; a green PVC beauty with a lot of life experience. She used to have a hole (it’s patched now) and she’s a little worn out, but she’s still tons of fun!
She’s used to canoeists of all skill levels, so you don’t have to worry about hurting her feelings if you accidentally bang her against the dock as you head out.
Terminology
Here are the basic concepts you’ll need to know for a successful first canoe ride on Painted Turtle Lake. If you’re curious about learning comprehensive canoeing terms and tricks, check out this Canoeing How To.
Keel: Centre line of the canoe
Gunwales: (pronounced gunnels) Side edges of the canoe
Bow: Front of the canoe
Stern: Back of the canoe
Deck: Small panels at the bow and stern ends of the canoe, handy grips for moving the canoe on land.
Paddle: The wooden stick you use in the water to propel & steer the canoe. Not to be confused with oars – those are for rowboats!
Blade: The lower, flat end of the paddle.
Preparing for the trip
Life Jacket:
Life jackets are the must-have fashion statement for this experience, as our insurance company would say. Check our House Manual for where to find them before you head down to the lake.
Footwear:
Save your flip-flops for beach days – you have to be sure-footed when moving around the canoe! Closed-toe water shoes or old sneakers are your best buddies here. If you’ve got ’em, crocs are the haute couture of canoeing footwear.
Paddling Positions:
Your seating arrangements depend on your crew size.
- If you’re a duo, you’ll know how to position the canoe because the back seat is tucked right against the stern while the front seat leaves room for your knees at the bow.
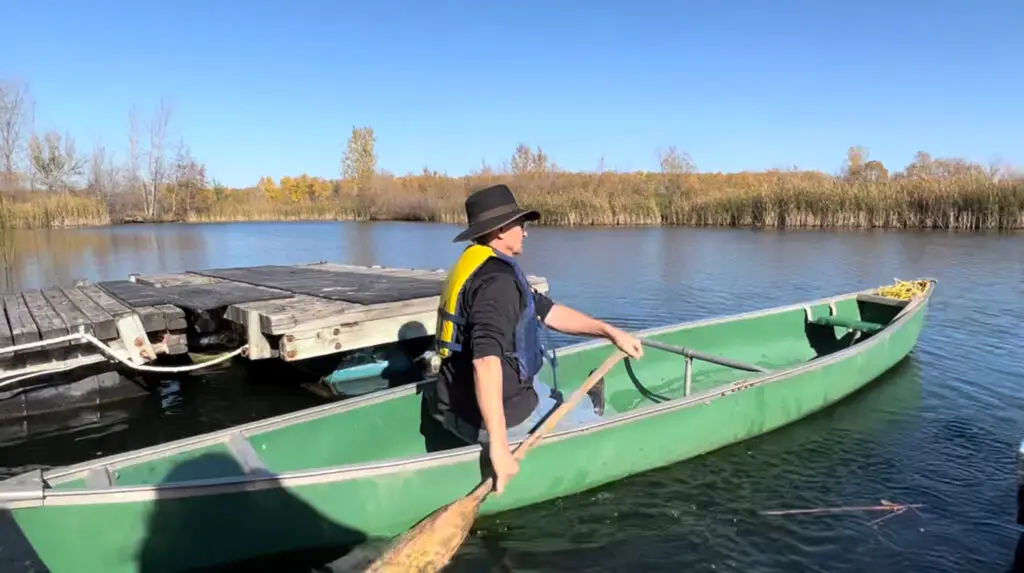
- If you’re going solo, you need to sit closer to the middle of the canoe to keep your weight balanced. Do this by sitting in what is usually the front seat and facing the opposite way, like my dad is in this photo.
Launching the Canoe
The best place to launch the canoe is between our two docks. The inside edge of either dock make it super easy to step into the canoe.
Review your Tenant Manual to see where we store the canoe and paddles. Once you flip the canoe over, you can grab the deck, haul it over the shoreline and angle it gently into the water.
The Art of Staying Dry
You’ve all seen those YouTube videos with botched canoe mounts. Everyone looks so hopeful, dare-I-say even confident, with their first step into the hull. It only takes a slow-motion second for it all to go sideways, their expressions melt into shocked resignation and they make a spectacular splash!
Check out my parents for inspiration in this video as they get in the canoe. They are experienced canoeists, but my mom has developed arthritis in her foot so you’ll see her moving very intentionally down the keel. If she can do it, so can you!
Follow these top three principles for staying dry and you’ll never find yourself on a failed-canoe-mount YouTube compilation.
- Center Your Weight: This is the golden rule of canoeing. Keep each foot planted firmly on either side of the keel at all times. When shifting your position in the canoe, use both hands simultaneously on both gunwales to keep yourself centred.
- Stay Low: There’s no faster way to tip than to stand up in a canoe! Always keep your centre of gravity as low as you can and make sure to stay in a crouch while moving around the canoe.
- The Tipping Point: As long as you follow the first two principles, you won’t need this third one at all. But in the unlikely event you have a lapse of concentration and end up with that tippy feeling, all is not lost! Keep both hands on the gunwales, stay low and lean towards the centre of the canoe. If all fails, just do your best Celine Dion impression as you go over, knowing your life jacket will give you an easy swim to shore.
- Do pull Courtney Love back to shore if you tip – she can survive almost anything but she’ll get lonely out there on her own!
Paddling the Canoe
Working Together
If there are two of you in the canoe, the bow paddler is the muscle. Try not to influence the direction of the canoe unless the stern paddler asks for help. Just focus on a strong, straight power stroke.
The paddler at the stern controls direction. Their paddle acts as a rudder, controlling the movement of the stern to guide the bow in the opposite direction.
If you are two canoeists of relatively equal strength, it usually works best to paddle on opposite sides from each other. It’s not a hard rule, though, so feel free to swap paddle sides however you need to coordinate the canoe’s direction. Since the paddler in the stern is steering, let them call the shots.
Basic Strokes
- Power Stroke: This is the bow paddler’s best friend – a straight stroke with your paddle blade perpendicular to the canoe. Check out my mom’s beautiful power stroke here.
- J Stroke: This steering stroke is used by the stern paddler. It sends the canoe in the same direction as the paddle side.
- Start a regular power stroke with your paddle perpendicular to the canoe. When your paddle gets about even with your body, start twisting the blade away from the stern of the canoe for the remainder of the stroke. You can see my Dad’s J Stroke twist in this video.
- C Stroke: This is another steering stroke for the stern paddler which guides the canoe in the opposite direction of the paddle side.
- Start your stroke farther out from the gunwales, with plenty of room between your paddle and the side of the canoe. When the paddle gets about even with your body, twist the blade in towards the canoe and pull it in toward the stern, like my dad in this video. Basically just be like my dad, and you’ll be fine. (winky face)
- Draw Stroke: This stroke can be used by either bow or stern paddler. It’s great in a tight spot, as it pulls the canoe directly sideways. If both paddlers use the draw stroke at the same time on opposite sides, you can turn the canoe on a dime. I’ve also heard it referenced somewhere as the relationship-saver stroke, because it can get you out of trouble if you find yourselves stuck and arguing with each other over how to get back on track!
- Reach your paddle out as far as you can perpendicular to your body with the blade parallel to the canoe. Pull it directly in towards your body. My parents are working in tandem on this stroke demo.
And that’s it! You’ve got a few tips and some basic paddle strokes, and you’re set to explore a whole new way of experiencing our little waterfront retreat.
Say hi to Sheldon if you spot him out there with his turtle buddies. I’d love to hear how your time was on the water – it’s my happy place and I love sharing it! Photos are a bonus too. Tag us @paintedturtlelake on Instagram and Facebook, or send me a message once you’re back on dry land!
Start Your Path Home
Join our waitlist and you'll be the first to know about future openings in our Loft or Studio apartments.
Check your inbox to confirm your name on our list.
Thank you!
You have successfully joined our subscriber list.

Leave a Reply